How to Upload Games to Retropie Wifi
The Raspberry Pi is a tiny device, merely information technology'southward surprisingly powerful – specially when you lot compare it to the beefy computers of the past. Take video game systems, for instance: while modern ones far outstrip the Pi, older models similar the Nintendo Entertainment System or Sega Genesis are weaklings in comparing. That makes the Raspberry Pi more than capable of playing retro games, and the folks behind the RetroPie project take developed a way to aid you lot do exactly that. Installing RetroPie on your Raspberry Pi will give y'all the ability to emulate a ton of old video game systems, essentially turning your Raspberry Pi into the ultimate retro gaming machine. Here'south how to play retro games on the Raspberry Pi with RetroPie.
Retro games on the Raspberry Pi: What you can play
The full list of emulators included with RetroPie is absolutely massive. Hither's a link to the full listing – we've included some of the highlights below, but in that location are far more than just these. Suffice it to say that if y'all desire to play retro games on the Raspberry Pi, you've come to the right identify.
Nintendo
- Game Boy
- Game Boy Accelerate
- Game Boy Colour
- Nintendo 64
- Nintendo DS
- Super Nintendo
- Nintendo Entertainment System (NES)
Sega
- Dreamcast
- Game Gear
- Genesis/Mega Drive
- Master Organisation
- Sega 32X
- Sega CD
- Sega Saturn
- SG-thousand
Sony
- PlayStation (PS1)
- PlayStation 2
- PSP
You'll also become directly ports of popular games like Cave Story and Doom.
How to play retro games on the Raspberry Pi with RetroPie
In social club to testify you how to play retro games on the Raspberry Pi with RetroPie, nosotros accept to cover a few different steps. First, you lot'll have to install RetroPie, which is a kind of operating system that includes EmulationStation – which is itself a powerful group of emulators.
Side by side, yous're going to accept to tweak a few settings, including Wi-Fi and controller settings.
Then, you'll need to add ROMs. Emulators run video game systems as virtual machines inside a computer, and ROMs are the game files themselves – the cartridges or discs to the emulators' systems, if you will.
We'll comprehend it all below.
What y'all'll demand
As is typical with these projects, you'll need a Raspberry Pi, a power source, a monitor/Idiot box and a way to connect to information technology, and peripherals (like a keyboard and mouse) for gear up-upwardly. Yous'll also need a few other things:
- A microSD card (at to the lowest degree eight GB)
- A USB game controller
- A Windows or Mac computer with a place to plug in your SD menu
How to install RetroPie
Installing RetroPie has e'er been pretty easy, merely it's easier than ever now. If y'all did this project a few years ago (like I did), yous'll notice it's only gotten simpler.
Stride i: Download RetroPie and unzip the disc epitome
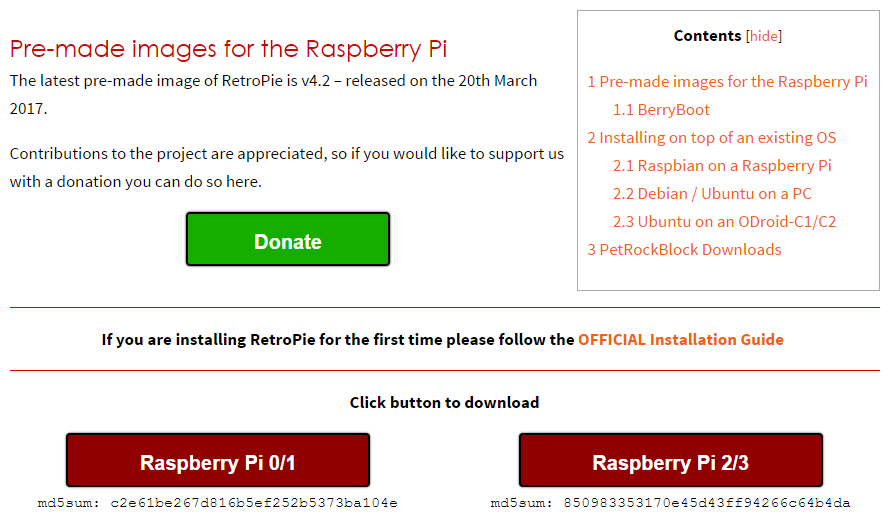
Yous can detect the latest version of RetroPie here. Download it to your figurer. It will exist compressed in .gz format – unzip it with WinZip or a like plan and then that information technology ends with simply .img.
Step 2: Extract the RetroPie disc epitome to your microSD card
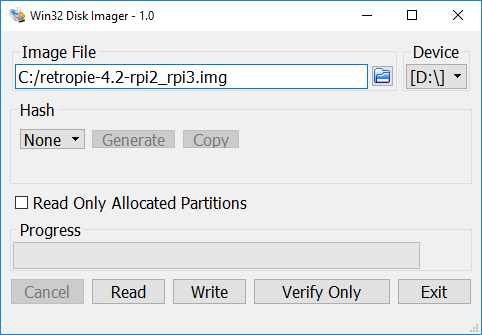
What you just downloaded and unzipped was the RetroPie disc image. Side by side, you lot're going to extract it to your microSD bill of fare. With Windows, this is super elementary:
- Download Win32 Disc Imager
- Open up Win32 Disc Imager
- Select the .img file and the correct disc (make certain information technology's your microSD card!)
With Mac, it goes similar this:
- Download RPI-sd card builder
- Open up RPI-sd bill of fare builder
- When prompted, choose the disc image
- When prompted, select your SD card (make certain you're writing to the correct identify!)
- Hit "OK" and enter your password. The program should do the rest.
Step iii: Put the microSD menu in your Raspberry Pi and boot it upwardly
That was easy, right? Accept your USB controller plugged in, because y'all'll exist setting information technology up adjacent.
How to gear up up RetroPie after installation
Now that your Raspberry Pi is running RetroPie, y'all're going to want to set upwards your net connectedness (nosotros'll need it to get your games moved over and to install whatever future RetroPie updates) and your gaming controller.
Pace 1: Gear up your controller
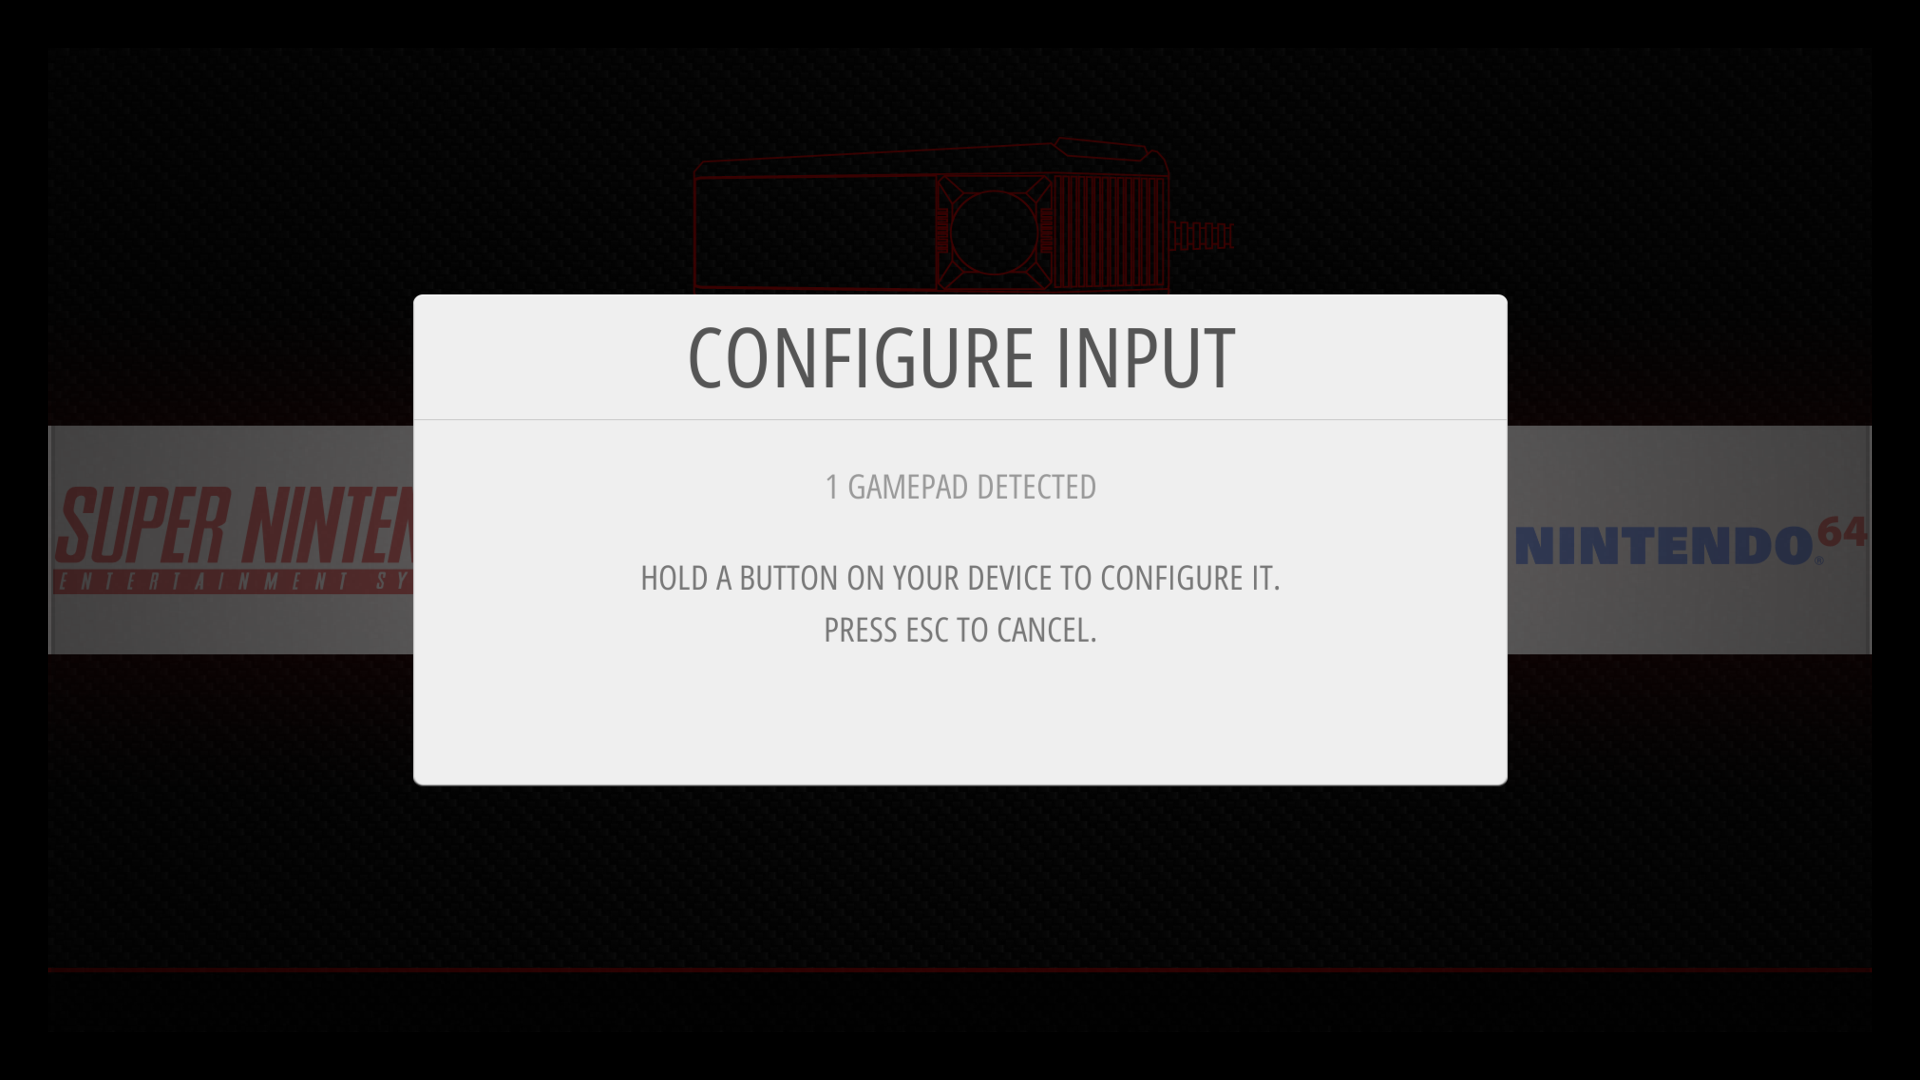
If RetroPie detects a USB controller, it'southward going to want you to set it up before you lot do anything else. To prepare a button value, merely bear on the button. The card will move on to the next value equally soon every bit you enter something for the first. If you're using a uncomplicated controller, yous may end up double-assigning certain buttons (L1 and L2 both to your only Fifty push, for instance). If you're looking to emulate more recent systems, you may want to opt for a controller with all the buttons you need – like a PlayStation 4 controller, for instance, which is what I used.
Step two: Gear up up Wi-Fi
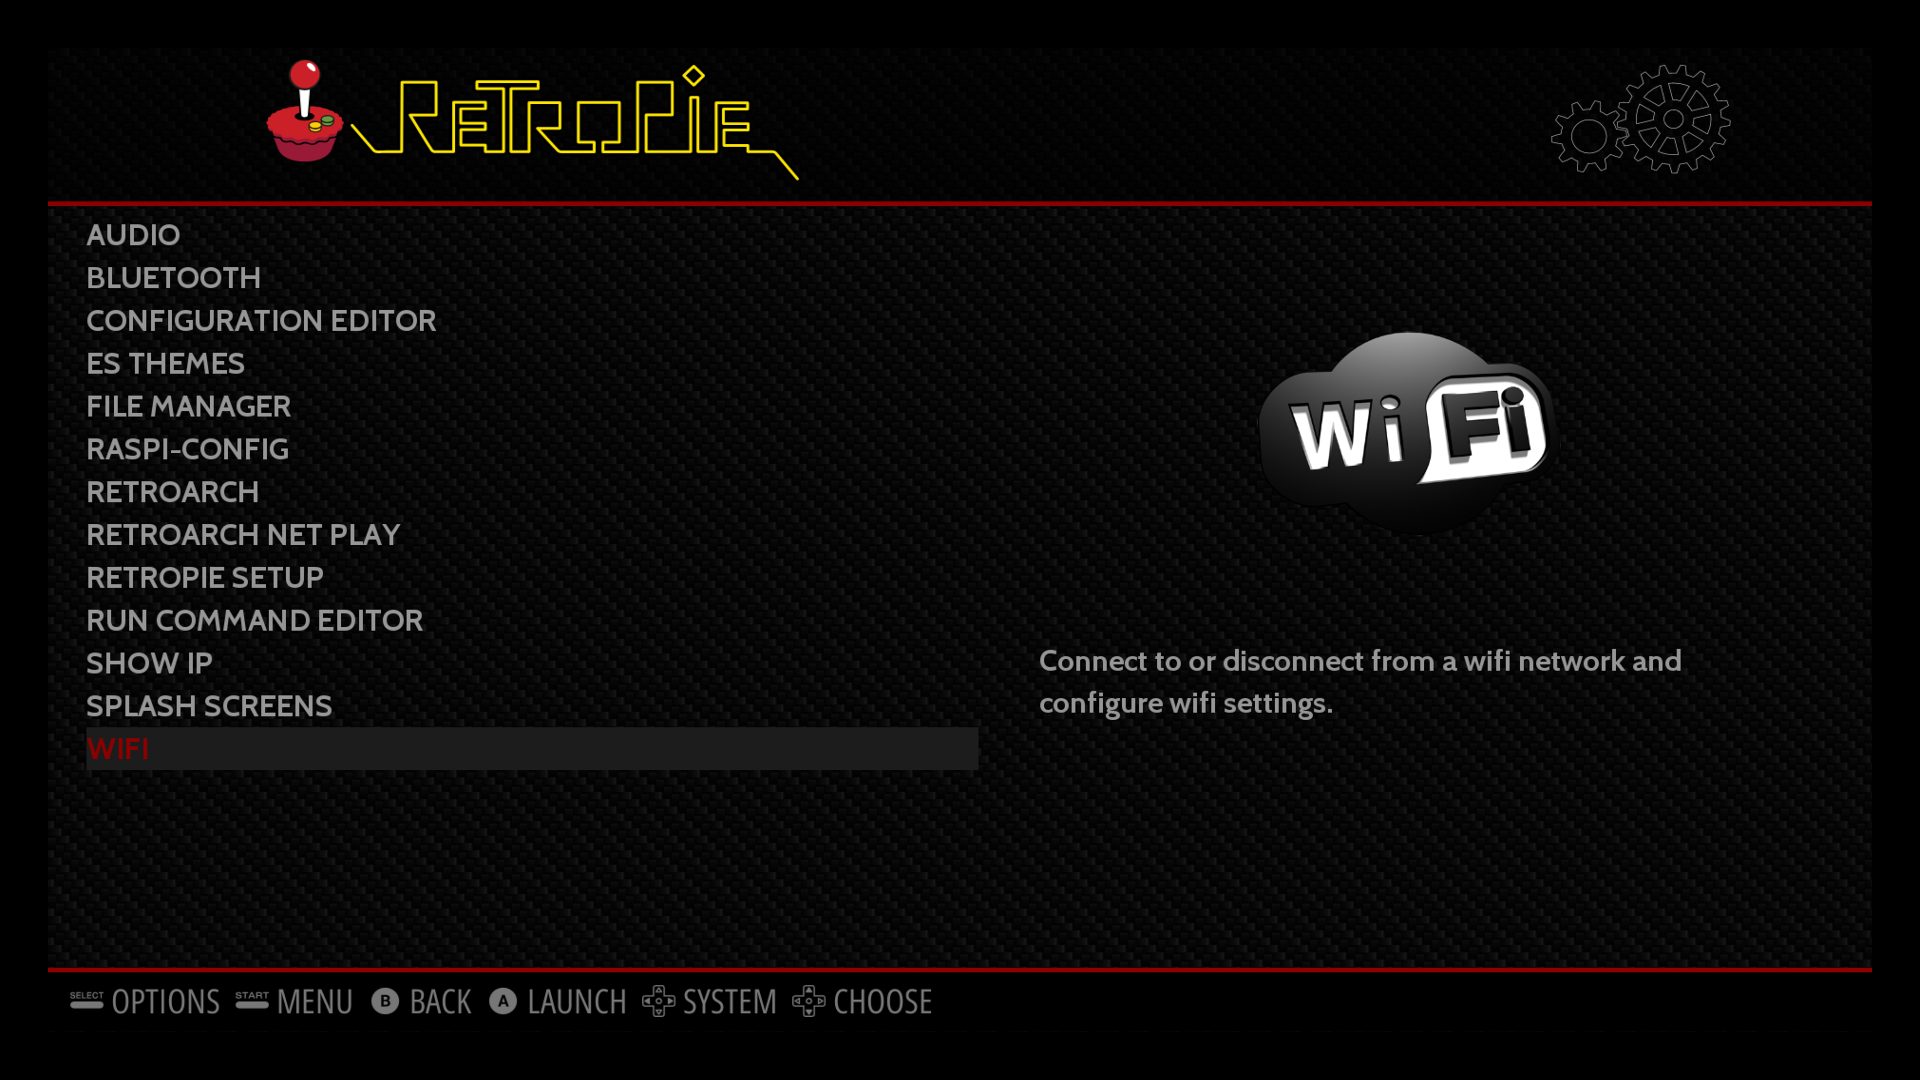
Caput to the settings card and scroll downwardly to the Wi-Fi option. You'll be able to choose your wireless network and enter your countersign. Connecting to Wi-Fi has gotten way easier since the early on days of the Raspberry Pi and RetroPie.
How to add emulators and play retro games on the Raspberry Pi with RetroPie
Your Raspberry Pi is now completely gear up, but y'all won't run across any emulators. That's because RetroPie automatically hides emulators that yous don't take whatever ROMs for. You have a way to play retro games on the Raspberry Pi, but you lot don't really have any retro games on your Raspberry Pi. So let'southward add some games by adding some ROMs!
ROMs are a little chip of a legal greyness expanse, just yous're more often than not supposed to only download ROMs for games that y'all already own in a physical media class. With that said, nosotros'll permit you get the ROMs onto your computer yourself. Once they're there, here'due south how you lot'll get them over to the Raspberry Pi.
Selection one: Use an external hard drive or USB drive
This is a super-simple way to become your ROMs to your RetroPie. Only put them all in a binder called retropie and put that binder on a USB storage device. Plug it into your Raspberry Pi, and yous're adept to go.
Option 2: Transfer files over your network
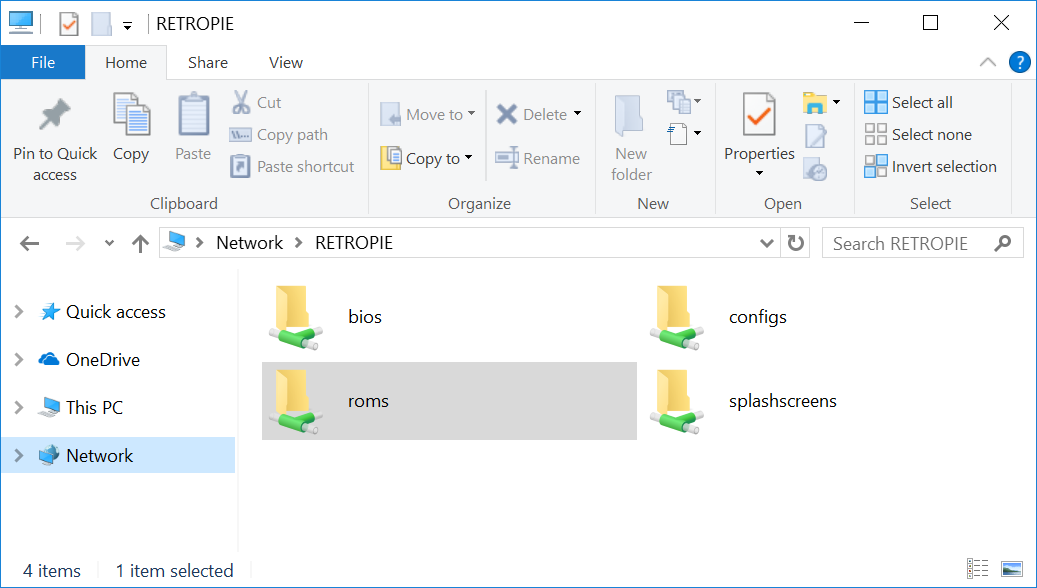
Using your network to become ROMs to your RetroPie used to be a (balmy) pain, merely the newer versions of the system have made it insanely piece of cake. Go to your file managing director on your reckoner and expect for shared folders. If your RetroPie is connected to your network, you should encounter a folder called RETROPIE (if it doesn't show up, type the address into the address bar straight: \\RETROPIE for Windows or smb://RETROPIE for Mac).
You will have to log in to access the binder. The default credentials are username: raspberry and password: pi.
Once y'all've spotted information technology, just drag your ROMS on into the binder. Done!
Source: https://thepi.io/how-to-play-retro-games-on-the-raspberry-pi-with-retropie/
0 Response to "How to Upload Games to Retropie Wifi"
Post a Comment